Popular in the 1950s and 1960s, the popcorn ceiling, also known as the cottage cheese ceiling, acoustic ceiling, or stucco ceiling, was installed to help absorb sound from above or to cover imperfections. It was an easier way to skip some steps and get the job done faster.
These days, however, the popcorn ceiling is widely considered somewhat of an eyesore, and homeowners moving into or living properties featuring this outdated decor method are often left wondering how to remove popcorn ceiling.
If you are moving into a new property or want to purchase a home with one or more stucco ceiling designs, or you want to cover up or remove this unsightly feature in your current home, rest assured it can be done. The process isn’t quick or easy, but there is an affordable DIY option to remove popcorn ceilings and modernize your home so you’re not groaning whenever you look up at the ceiling.
Do I Need A Professional To Remove Popcorn Ceiling?
While hiring a contractor to help you remove the popcorn texture from your ceiling is more straightforward, it can also be costly, and doing it yourself can save you money. However, there are some things you need to check before you embark on a project of this magnitude.
If your home was constructed prior to the 1980s, then there is a big possibility that your home contains asbestos. While in its undisturbed form, asbestos isn’t harmful. Once the particles have been released into the air, there is a risk of harm to anyone who breathes in the fine dust-like particles.
Asbestos was used primarily for its soundproofing and fire-resistant properties, but it wasn’t known about the harmful effects it could have on your health at that time. So if you’re embarking on a DIY popcorn ceiling removal, you should first get yourself an at-home asbestos kit to test the ceiling before removing it. Equip yourself with the appropriate safety equipment; you will need a dust mask, ventilator, gloves, and eyewear to carry this out. Once you have completed the test, send the sample off immediately to an asbestos laboratory.
Should the results come back positive for asbestos, you must call the professionals to safely remove all traces of this harmful material from your home. Or you should cover the whole ceiling in drywall or paneling to avoid disrupting the fibers and forgo removing the popcorn ceiling completely.
Once you have ascertained the presence or lack of asbestos, should the case be, then you need to look at the scope of the work required. This isn’t a job you can complete in a few hours if you are looking at a larger ceiling or multiple rooms. Experts suggest it can take up to 20 hours to remove 500 square feet of popcorn textured ceiling for an experienced DIYer; for less experienced or novices, this can be considerably longer.
You will need to measure the surface the texture is covering and then assess your skill level to be able to dedicate the time required for such a comprehensive and time-consuming job.
How to Remove Popcorn Ceiling: A DIYers Guide
Before starting this project, you will need to collate the required tools to carry out the work.
These can include;
- An at-home asbestos kit in the first instance unless your home was fabricated post-1980s.
- Drywall taping knife or a putty knife
- Plastic sheeting
- Painter’s tape
- Drywall mud pan
- Garden sprayer
- Safety goggles
- Dust mask
- Overalls
- Sandpaper
- Sander
- Ladder
- Paint
- Tarp/Safety coverings/plastic sheeting for walls
From here, you can move on to the following steps.
Step 1: Checking for Asbestos
Chances are, if your home was built before the 1980s, it will have around 1-20% of asbestos in it. If the test kit yields positive results, you can call in an expert asbestos removal company to safely eradicate all traces of asbestos. But if the ceiling is in good condition and undisturbed, you can leave it or cover it up.
Another option is to skim-coat the ceiling. If the ceiling has been painted in the past, then you can apply a skim coating with an ultra-light compound to smooth the appearance. This won’t disturb the asbestos, but it will likely take two coats before sanding to ensure you aren’t sanding down the original materials, only the skim layers. After sanding, the ceiling should be primed and painted.
Step 2: Cover Furniture and Walls
Once the asbestos issues have been resolved either way, you need to make sure you’re covering all of your belongings before you start any work. This means adding taup or covering up all furniture and applying plastic sheeting to walls with painter’s tape. Scraping ceilings is a time-consuming and messy affair, and the last thing you want is a bigger clean-up job once you have finished because you didn’t cover anything up or remove items from the room. Have more drop cloths and plastic coverings than you think you might need in case of damage.
Step 3: Remove Ceiling Lights and Fans
You will be using a garden sprayer to spray the ceiling to soften it so you can remove it. This means you need to remove all electrical fittings where possible and cover up any electric boxes, HVAC unit vents, outlets, and light switches. Use plastic sheeting sealed with painter’s tape to avoid getting your electrical components wet and causing more damage.
Step 4: Be Safe
There will be a lot of dust and debris flying around once you get started, so you need to open any windows in the room and ensure you are wearing appropriate clothing; painters clothing or coveralls can be helpful, and you are wearing your breathing mask and safety goggles to protect your eyes and airways. Always wear gloves to avoid damage to your hands and give you a better grip when scraping the popcorn ceiling.
Step 5: Spray the Ceiling
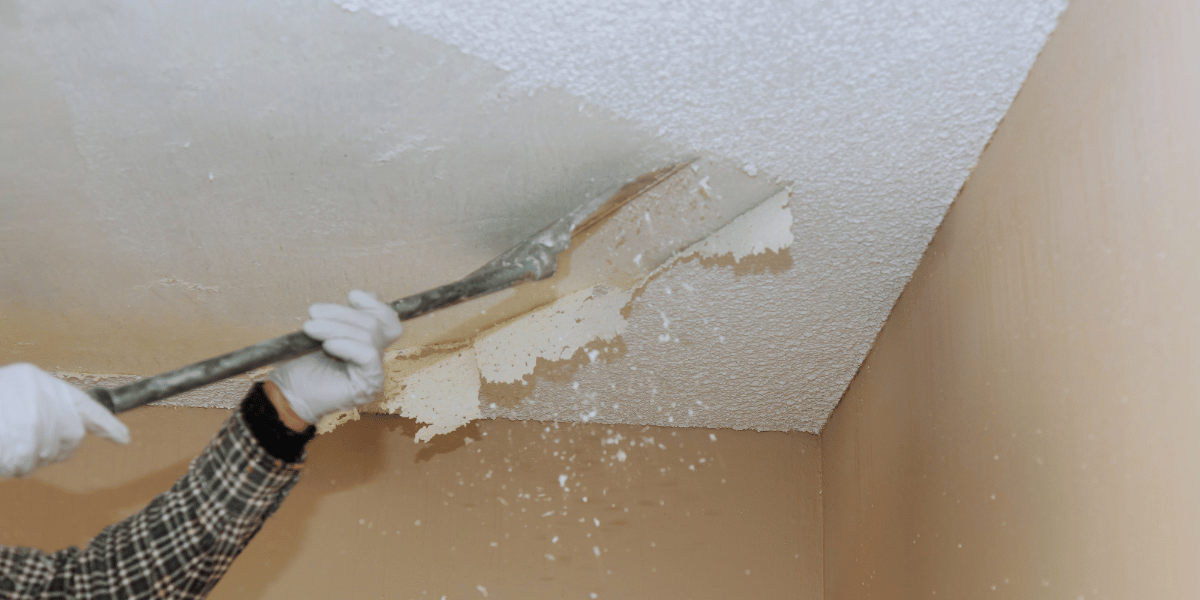
You need to spray the ceiling to help you remove the texture more easily; wet scraping is infinitely easier than dry scraping. Use your garden sprayer to soak small spaces at a time; think four-foot by four-foot areas maximum. Lightly dampen the ceiling; too much water can cause further damage, which you want to avoid, so start with a light spray, then use more water if required. After spraying, leave for 15 minutes to soak in, and then begin scraping. Complete each area before moving on to the next section.
Once you are ready to start scraping, use your putty knife or drywall taping knife to scrape across the ceiling gently. Be careful not to gauge too much as to damage the sheetrock underneath. A good tip can be to file down the edges of your putty knife to remove sharp angles that dig further than you need to. You might need to respray or go over the section more than once to get the smooth finish, but adding more water as required will facilitate this.
Step 6: Smooth the Ceiling
Once all of the popcorn texture has been removed, then you need to start the process of making sure the ceiling is smoothed out before carrying on. If there are any chips or gauges, you need to use a joint compound to smooth these over and fill any holes you caused by removing the popcorn coating. Once you have smoothed the ceiling out, let it dry for 12 hours before sanding it down.
Step 7: Prime and Paint
Once you have a nice smooth ceiling post-sanding, you must first apply primer to the surface. Once the primer is dry, add two coats of your chosen paint to the ceiling.
Step 8: Add Fittings and Clean Up
When the paint is fully dry, you can then add the ceiling fans or light fittings back to their previous placements and remove all of the covers and plastic sheeting from the walls and furniture. Make sure to give the room a deep clean to remove leftover dust, dirt, and paint from the room so it is ready to use again.
Should You Remove Popcorn Ceiling?
If you don’t want to live with the eyesore that is the dreaded popcorn ceiling, then you absolutely can look at how to remove popcorn ceiling. But first, doing the asbestos test, you can check out your options, knowing the results or the condition of the throwback ceiling design.
But, if removing the ceiling seems like too much hard work, it isn’t a quick or easy job, and it will be messy, then you can look into other options, such as covering the design with paneling, pressed tin tiles, or adding drywall so it is covered.
If you want to cover up the ceiling instead of removing it, you will need to use furring strips to attach any paneling to avoid any uneven look; this will require you to remove small sections of the ceiling to attach the furring strips so you will still need to do an asbestos test for this option. If you are covering it with drywall, you can cover it directly by attaching the drywall with a nail gun, and tiles can be added to the popcorn ceiling using construction adhesive.

